LED lights up, bypass works, but nothing from the effect....This is probably the most common general problem we see posted here for new Large Beaver builds, and can be caused by a wide variety of mistakes or defects. To troubleshoot this problem effectively, the first step I recommend taking is to determine if the problem is in the effect circuitry itself or a problem getting the signal into or back out of the PCB. Fortunately, this latter condition is easy to check.
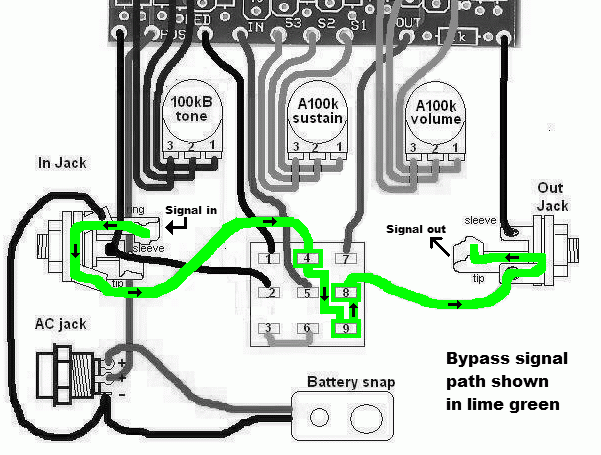
STEP 1 - CHECKING SIGNAL INPUT AND SIGNAL OUTPUTWhen the pedal is in bypass, the signal passes from the incoming instrument cable or patch cord to the tip of the input jack. That is then wired to lug 4 of the footswitch. When the effect is in bypass mode, the signal then travels through the jumper wire connecting lug 4 to lug 9, and then through the 3PDT switch connection to lug 8. That lug connects to the tip of the output jack and on to your amp or the next effect in your pedal chain. By the way, this is a good time to emphasize the fact that, if your pedal does NOT work in bypass mode, the problem
has to be in that brief circuit path, and the effect circuit itself--all of the installed componentry on the circuit board--is NOT involved. (This is not the case with the newer BYOC designs with the jacks at the top and the footswitch near the bottom, where the incoming and outgoing signal is routed through tracing on the PCB, though it still doesn't go through the actual effect circuitry.)
So the summarize the bypass signal flow (see first diagram below):
Incoming signal --> input jack tip --> footswitch lug 4 --> footswitch lug 9 --> footswitch lug 8 --> output jack tip --> out to amp/next pedal
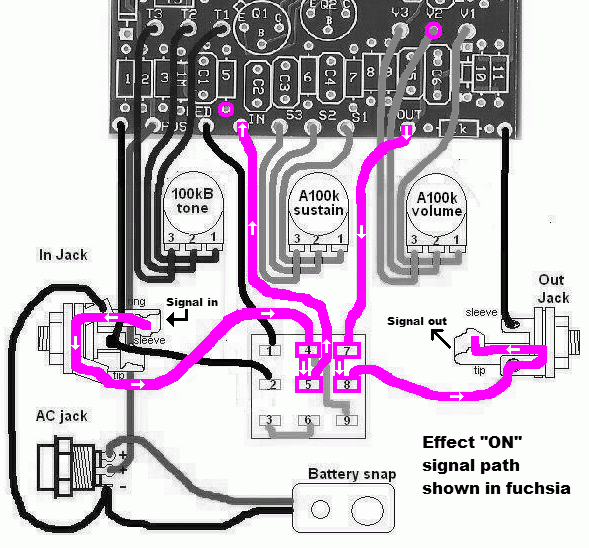
When the effect is "on", the signal routing obviously changes so that it flows through the effect circuitry on the PCB. In this case, when the signal gets to lug 4, it's now connected through the footswitch to lug 5, which routes it into the effect circuit at the eyelet labeled "IN" on the PCB. The processed signal then exits the PCB again at the eyelet labeled "OUT", which is wired to lug 7 of the footswitch. This connects internally through the switch to lug 8, and then goes to the tip of the output jack and on its way to your amp/next pedal.
So to summarize the "Effect ON" signal flow (see second diagram below):
Incoming signal --> input jack tip --> footswitch lug 4 --> footswitch lug 5 --> PCB --> footswitch lug 7 --> footswitch lug 8 --> output jack tip --> out to amp/next pedal
Thus, to determine whether or not your "no effect output" problem is on or off the PCB, you need to confirm continuity from (1) lug 4 into the PCB, and (2) out from the PCB to lug 8. If bypass is working, you don't have to worry about what's before lug 4 or after lug 8 on the footswitch--bypass wouldn't work if the problem was in either of those places.
To do this, you'll need a multimeter. The ones with an audible signal continuity check function are very convenient, so if yours has that function, by all means use it. However, any multimeter will work for testing continuity. Just set it to the lowest resistance test setting (often 200 ohms) and touch the two probes to either end of the section of circuit being tested for continuity. A good connection will have nearly no measureable resistance, while an open circuit will read as infinite resistance. Here's the test sequence I'd recommend:
- WITH THE PEDAL TURNED ON, test between lug 4 of the footswitch and the bottom eyelet connection for resistor R5 on the PCB (circled on second diagram). The bottom of R5 is the first component connection at the input of the effect circuit on the PCB. If you have continuity between these two points, your signal is making into the effect circuit. Move on to step 3.
- If you don't have continuity between these points, you need to isolate where the problem is. Keep one probe on lug 4, and move the other to the "IN" eyelet on the board. If you have continuity there, then the trace connecting the IN eyelet to the R5 bottom eyelet is damaged (very rare!). If still no continuity, move that probe back to lug 5 on the footswitch. If you have continuity there, then the wire connection to the IN eyelet is bad and needs to be redone. Still no continuity between lug 5 and lug 4? Then your footswitch is damaged (usually by too much heat during soldering) and needs replacing.
- Next, check the output side continuity by testing between lug 8 of the footswitch and the middle connection of the volume pot to the PCB, labeled "V2" (circled on second diagram). This is the last component connection at the output of the effect circuit on the PCB. If you find continuity between those two points and the input side continuity tested in step 1 was also good, your problem must be in the effect circuit on the PCB itself. Proceed to step 4.
- If there's no continuity between V2 and lug 8, you need to isolate where it's being lost. Keep one probe on lug 8 and move the other down to the "OUT" eyelet on the board. If you have continuity there, then the trace connecting the OUT eyelet to the V2 connection is damaged (very rare!). If still no continuity, move that probe back to lug 7 on the footswitch. If you have continuity there, then the wire connection to the OUT eyelet is bad and needs to be redone. Still no continuity between lug 7 and lug 8? Then your footswitch is damaged and needs to be replaced.
I'll add more to this troubleshooting guide as time allows....
_________________
“My favorite programming language is SOLDER” - Bob Pease (RIP)
My Website *
My Musical Gear * My DIY Pedals:
Pg.1 -
Pg.2


